Image Processing – Photography Sepia-toning Effect
Sepia-toning effect is used very commonly in photography.It is the process of changing the intensity on every pixel color of a gray-scale image, or so-called black-and-white.
Look up the concepts of Sepia on Wikipedia.
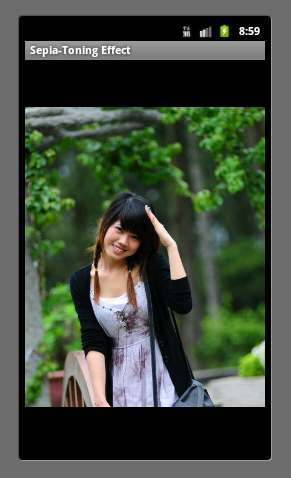
This is the original one:
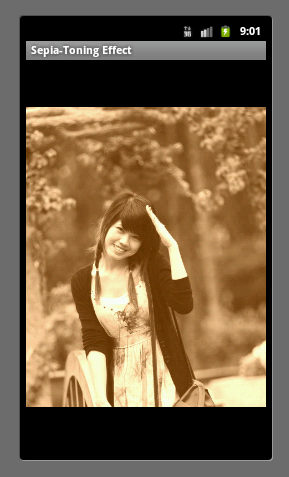
If I try to apply the sepia effect for each color channel as majority, it results much pretty nicely 🙂
When I try to increase the depth of Red & Green, it results in a brighter one.
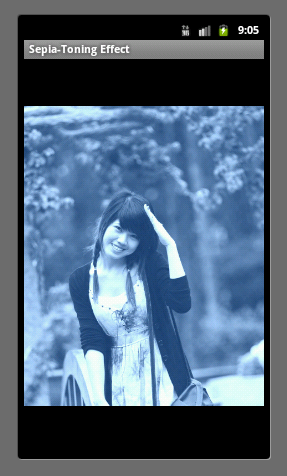
Above images applied Red as majority,now trying the rest over gray-scale image:
This is a really really cool effect!
My implementation is simple based on its concepts:
	public static Bitmap createSepiaToningEffect(Bitmap src, int depth, double red, double green, double blue) {
		// image size
		int width = src.getWidth();
		int height = src.getHeight();
		// create output bitmap
		Bitmap bmOut = Bitmap.createBitmap(width, height, src.getConfig());
		// constant grayscale
		final double GS_RED = 0.3;
		final double GS_GREEN = 0.59;
		final double GS_BLUE = 0.11;
		// color information
		int A, R, G, B;
		int pixel;

		// scan through all pixels
		for(int x = 0; x < width; ++x) {
			for(int y = 0; y < height; ++y) {
				// get pixel color
				pixel = src.getPixel(x, y);
				// get color on each channel
				A = Color.alpha(pixel);
				R = Color.red(pixel);
				G = Color.green(pixel);
				B = Color.blue(pixel);
				// apply grayscale sample
				B = G = R = (int)(GS_RED * R + GS_GREEN * G + GS_BLUE * B);

				// apply intensity level for sepid-toning on each channel
				R += (depth * red);
				if(R > 255) { R = 255; }

				G += (depth * green);
				if(G > 255) { G = 255; }

				B += (depth * blue);
				if(B > 255) { B = 255; }

				// set new pixel color to output image
				bmOut.setPixel(x, y, Color.argb(A, R, G, B));
			}
		}

		// return final image
		return bmOut;
	}
Hope you like it!
Cheers,
Pete Houston
Categories: Tutorials
effect, image, photography, processing, sepia, toning, tutorials


![[xjaphx] at Stack Overflow, Q&A for professional and enthusiast programmers [xjaphx] at Stack Overflow, Q&A for professional and enthusiast programmers](http://stackoverflow.com/users/flair/801396.png?theme=dark)
Thanks
Pleas any one tell me that how this Effect Apply On Costume Camera in Android……. So that i also able to save image with this Effect……
I have error :
03-02 15:06:55.328: E/AndroidRuntime(25347): FATAL EXCEPTION: Thread-21252
03-02 15:06:55.328: E/AndroidRuntime(25347): java.lang.OutOfMemoryError
03-02 15:06:55.328: E/AndroidRuntime(25347): at android.graphics.Bitmap.nativeCreate(Native Method)
03-02 15:06:55.328: E/AndroidRuntime(25347): at android.graphics.Bitmap.createBitmap(Bitmap.java:640)
03-02 15:06:55.328: E/AndroidRuntime(25347): at android.graphics.Bitmap.createBitmap(Bitmap.java:620)
Help me!
can u please provide me the value of all parameters to be passed for each like :
Red & Green, no Blue(with depth) :—
Red & Green (increasing), no Blue(with depth) :–
Blue as majority (with depth):–
Green as majority (with depth):–
as i have tried each and every combination but couldn’t get the above shown effect. thanks in advance.
Please do it.. thanks . have a great day .
try this
endImage = Imageeffects.createSepiaToningEffect(startImage,150,.7, 0.3, 0.12);
note the sum of the value R,G,B less than 1, and if you want to decrease the saturation increse the depth to 100
hey but it crashes with png image conversion. it works only for jpeg format. please help me in this regaerd
i dn’t know how to apply this on imageview image.kindly guide.. ??
this is not working for me..
i called the method like this
createSepiaToningEffect(org_bmp,2, 0.3, 0.5, 0.59);
and implement like this
public static Bitmap createSepiaToningEffect(Bitmap src, int depth, double red, double green, double blue) {
// image size
int width = src.getWidth();
int height = src.getHeight();
// create output bitmap
Bitmap bmOut = Bitmap.createBitmap(width, height, src.getConfig());
// constant grayscale
final double GS_RED = 0.3;
final double GS_GREEN = 0.5;
final double GS_BLUE = 0.59;
// color information
int A, R, G, B;
int pixel;
// scan through all pixels
for(int x = 0; x < width; ++x) {
for(int y = 0; y 255) { R = 255; }
G += (depth * green);
if(G > 255) { G = 255; }
B += (depth * blue);
if(B > 255) { B = 255; }
// set new pixel color to output image
bmOut.setPixel(x, y, Color.argb(A, R, G, B));
}
}
// return final image
return bmOut;
}
each time i change arguments value and the value of
final double GS_RED = 0.3;
final double GS_GREEN = 0.5;
final double GS_BLUE = 0.59;
The image only variates between black and white colors. there is no lining of green/blur or red color
Excelent Pete, please, Do you know, how can I add a frame pic to the pictue?
iam new to android i donno how to implement this..can u provide me sample code of implementation of image effects for android??
really great tutorials…….helped me a great deal…………carry on Mr. xjaphx……..Good luck and be happy 🙂
HI, Could you please let us know the value of depth that you have used to get the red , green and blue sepia effects in the above images. Thanks – Vibgyor
Please any one tell me how to apply sad and smile effects on an image using android……
plz…..
Great Work…..Work fine 4 me…..Thanks
How is the algorithm to achieve lomo effect ?
I didnt find the toy cam algorith, but found the blur effect (http://www.jhlabs.com/ip/blurring.html), and there is some java code there. Please, send me your e-mail using the email i am using for this comment. Thanks
I already knew this page. I’m currently working on Blurring effect 🙂
Anyways, you mean your email or my email?
send me your e-mail so we can discuss these things. But send your e-mail to my e-mail, you can get it from my comments (i think). I saw your other post about convolution and made a comment there, so forget this comment since you are already working in the Bluring effect! Thanks a lot buddy
Ok…. i will see what I can find about the toycam… I see a lot of android app doing it, but i dont know how they have implemented it, but lets keep in touch. If you know any other effect that can be applied to an image, let me know. I would be glad to discuss / implement them with you. Maybe we can create some effects lib.
@Junior & Thiago:
– The top sepia images are Red-majored toning so just input the value of Red as maximum. Like: (R, G, B) = (1.5, 0.6, 0.12)
– The same idea with the two below sepia ones:
+ For Green-majored toning: (R, G, B) = (0.88, 2.45, 1.43)
+ For Blue-majored toning: (R, G, B) = (1.2, 0.87, 2.1)
Additionally, as you increase the value of the major color channel, it will result in a brighter image.
Cheers,
Pete Houston
Great… and what about the depth value? Are you using the same for all of them or you are varying the depth as well? I think i am getting there! I say another Thiago’s comment on other post regarding the toy cam effect. Have you tried this before? I am building an application that takes a picture and then apply some effects, but toycam effect is really rare to find how to implement. Again, thank you very much for your reply, it is helping me a lot.
You can try value range from 0-255 for depth, well you can set value and try to find out its range!
I don’t really know about toycam effect, however if you give me some pages to explain about it, I may find a way to implement on Android.
I am also not able to reproduce the same pictures you did. Can you please provide the numbers you used to achieve the result for each picture? It would be really nice to make this work here. Thank you very much
can you please add the values for each picture? I am trying to use your function but i am always getting a blank bitmap as result